

So I searched. One of my main problems is that I like to be able to feel textiles before I buy them. Unless there is a very convincing tactile review on an online product, I generally won't even consider it. This pretty much took the internet out of my search parameters except for finding store locations. I found plenty of rugs. Some of them I even liked. All of those fell into the categories of too expensive, or a cat could easily destroy it in a could of weeks. The rest were either I just couldn't stand to put next to my bed, or felt terrible.
After despairing a bit I turned to my stash to see what was in there. Lo and behold, in there I found a bundle of sash cord that I had bought years ago to experiment with, but never got around to it. The cording was a bit unwieldy, and with only 100 feet, it wasn't going to go very far if I started to work with it on it's own. In comes a bunch of dishcloth cotton that I thing I got for a bag somewhere along the line. The two seemed to work together well. Together they have a bit of forgiveness when pressed on and felt like lightly plied cotton when rubbed against.
Now, my first instinct on rugs is to weave them. My apartment is way to small for a project like that though. Knitting was out too just because it seemed more difficult that I wanted to deal with. So that left me with crochet. I could do that.
Now I had to come up with a basic shape. Rectangles are always a favorite to sit next to a flat object, but somehow it that shape didn't really appeal after looking at all of the other rugs. Circles are pretty simple, and to make them with crochet one usually makes a spiral. I like spirals, but I didn't what just a circle. That seemed dull. But if I went crazy with the design, it would be done probable at about the same time Bug-A-Boo was in high school. So I went with a shape that was basically circular, but with a bit of an interest.
In the end our household has a rug my stash pile is unnoticeable smaller.
Currently our Sam Cat has taken over my rug, so I'm interested to find out when I get it back. She also enjoys the small holes that I added in to change the shape a bit. Sam Cat has attacked them a few times just to make sure that there's nothing hiding in there, and so far the rug is not showing any damage.
If you would like a PDF of this pattern and have a Ravelry account, a copy can be found here.
If you would prefer a PDF from Etsy, it can be found here.
If you would prefer a PDF from Etsy, it can be found here.
Feel free to change the thread, gauge, or size to fit your needs. Add an edging, or leave it as is. Use the charts as reference for other patterns. Just please do not try to sell this pattern as your own. I'll warn you though. The math worked out a bit differently than I expected when I started crocheting over the cording.
If you have any problems that you think that I might be able to help you with, email me at GridMammalCrafts@gmail.com .
I hope that you enjoy this rug as much as Sam Cat.
Lazy Eye Rug

Materials:
·
1 Hank Wellington, Medium Load, Braided
Cotton Multi-Purpose Sash Cord, 7/32 in x 100 ft.
·
5 Skeins Lily, Sugar’n Cream, 95 yds./86
m: Color – Countryside Ombre
·
Size G, 4 mm Crochet Hook
·
Stitch Marker
·
Darning Needle
Gauge:
·
13 Stitches x 5 Rows = 3” x 3” in Single
Crochet over Cording
Finished Size:
·
Approx. 27.5” wide x 24.5” tall
Notes:
·
Do not place this rug next to open flame
or extreme heat.
·
All stitches use the yarn crocheted
around the sash cord
·
Be careful not to crochet too much twist
into the cording as you go around.
·
Check work regularly to make sure that
the rug remains fairly flat.
·
Keep an easy tension. If the tension is too tight, the work will
start to turn into a basket.
·
Mind rounds 7, 15, 19, and 24. These are the rounds where the rhythm of the
pattern changes.
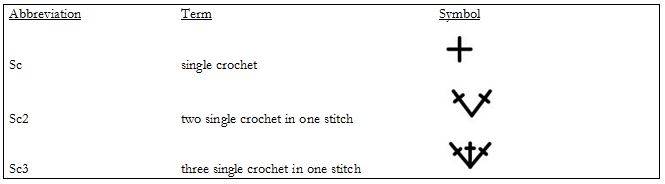
Key:
Instructions:
Remove
the end of the cord from the bundle and make a mark ~ 3” from the end.

Starting
at the tip of the cord, single crochet 15 stitches around the cord between the beginning
and the mark
Rotate
the crocheted portion into a circle with the stitches on the outside.

All
stitches will be crocheted around the cord as you go.
Round
1: Single crochet two stitches into the second stitch from the tip of the
cord. Mark the first stitch as the
beginning of the round. Crochet two
stitches into each of the next thirteen stitches. (28 stitches)

Round
2: (Sc 2 into the first stitch, sc into the next stitch) x 14 (42 stitches)
Round
3: (Sc in the first two stitches, sc2 into the next stitch) x 14 (56 stitches)
Round
4: (Sc in the first stitch, sc2 in the next stitch, sc in the next two
stitches) x 14 (70
stitches)
Round
5: (Sc in the first four stitches, sc2 in the next stitch) x 14 (84 stitches)
Round
6: (Sc in the first three stitches, sc2 in the next stitch, sc in the next two
stitches) x 14 (98
stitches)
Round
7: [(Sc in the next seven stitches) x 6, sc crochet around the cord 13 times,
skip 7 stitches] x 2 (110 stitches)

Round
8: [Sc in the first seven stitches, (sc in the next six stitches, sc2 in the
next stitche) x 4, sc in the next seven stitches, sc in the next six stitches,
sc3 in the next stitch, sc in the next six stitches] x 2 (122 stitches)

Round
9: [Skip one stitch, sc in the next six stitches, (sc in the first four
stitches, sc2 in the next stitch, sc in the next three stitches) x 4, sc in the
next six stitches, skip one stitch, sc in the next seven stitches, sc3 in the
next stitch, sc in the next seven stitches] x 2 (130 stitches)
Round
10: [Skip one stitch, sc in the next five stitches, (sc in the next two
stitches, sc2 in the next stitch, sc in the next six stitches) x 4, sc in the
next five stitches, skip one stitch, sc in the next eight stitches, sc3 in the
next stitch, sc in the next eight stitches] x 2 (138 stitches)
Round
11: [Skip one stitch, sc in the next four stitches, (sc in the next nine
stitches, sc2 in the next stitch) x 4, sc in the next four stitches, skip one
stitch, sc in the next nine stitches, sc3 in the next stitch, sc in the next
nine stitches] x 2 (146 stitches)
Round
12: [Skip one stitch, sc in the next three stitches, (sc in the next seven
stitches, sc2 in the next stitch, sc in the next three stitches) x 4, sc in the
next three stitches, skip one stitch, sc in the next ten stitches, sc3 in the
next stitch, sc in the next ten stitches] x 2 (154 stitches)
Round
13: [Skip one stitch, sc in the next two stitches, (sc in the next five
stitches, sc2 in the next stitch, sc in the next six stitches) x 4, sc in the
next two stitches, skip one stitch, sc in the next eleven stitches, sc3 in the
next stitch, sc in the next eleven stitches] x 2 (162 stitches)
Round
14: [Skip one stitch, sc in the next stitch, (sc in the next three stitches, sc2
in the next stitch, sc in the next nine stitches) x 4, sc in the next stitch,
skip one stitch, sc in the next twelve stitches, sc3 in the next stitch, sc in
the next twelve stitches] x 2 (170 stitches)
Round
15: [Skip one stitch, sc in the next fourteen stitches, (sc in the next
thirteen stitches, sc2 in the next stitch) x 2, sc in the next fourteen stitches,
skip one stitch, sc in the next thirteen stitches, sc3 in the next stitch, sc
in the next thirteen stitches] x 2 (174 stitches)
Round
16: [Skip one stitch, sc in the next thirteen stitches, (sc in the next eleven
stitches, sc2 in the next stitch, sc in the next three stitches) x 2, sc in the
next thirteen stitches, skip one stitch, sc in the next fourteen stitches, sc3
in the next stitch, sc in the next fourteen stitches] x 2 (178 stitches)
Round
17: [Skip one stitch, sc in the next twelve stitches, (sc in the next nine
stitches, sc 2 in the next stitch, sc in the next six stitches) x 2, sc in the
next twelve stitches, skip one stitch, sc in the next fifteen stitches, sc 3 in
the next stitch, sc in the next fifteen stitches] x 2 (182 stitches)
Round
18: [Skip one stitch, sc in the next eleven stitches, (sc in the next seven
stitches, sc2 in the next stitch, sc in the next nine stitches) x 2, sc in the
next eleven stitches, skip one stitch, sc in the next sixteen stitches, sc 3 in
the next stitch, sc in the next sixteen stitches] x 2 (186 stitches)
Round
19: [Sc in the next eleven stitches, (sc in the next five stitches, sc2 in the
next stitch, sc in the next twelve stitches) x 2, sc in the next eleven
stitches, sc in the next seventeen stitches, sc3 in the next stitch, sc in the
next seventeen stitches] x 2 (194 stitches)
Round
20: Sc in the next eleven stitches, (sc in the next three stitches, sc2 in the
next stitch, sc in the next fifteen stitches) x 2, sc in the next ten stitches,
sc in the next three stitches, sc2 in the next stitch, sc in the next fifteen
stitches, sc3 in the next stitch, sc in the next fifteen stitches, sc2 in the
next stitch, sc in the next three stitches, sc in the next ten stitches, (sc in
the next three stitches, sc2 in the next stitch, sc in the next fifteen
stitches) x 2, sc in the next ten stitches, sc in the next three stitches, sc2
in the next stitch, sc in the next fifteen stitches, sc3 in the next stitch, sc
in the next fifteen stitches, sc2 in the next stitch, sc in the next two
stitches, (Remove stitch marker.) sc
in the next stitch (This is the new end
of the round. Replace the stitch marker
as needed.) (202 stitches)
Round
21: [(Sc in the next nine stitches, sc2 in the next stitch) x 8, sc in the next
stitch, sc3 in the next stitch, sc in the next stitch, (sc in the next nine
stitches, sc2 in the next stitch) x 2] x 2 (230 stitches)
Round
22: [(Sc in the next seven stitches, sc2 in the next stitch, sc in the next
three stitches) x 8, sc in the next two stitches, sc3 in the next stitch, sc in
the next two stitches, (sc in the next seven stitches, sc2 in the next stitch,
sc in the next three stitches) x 2] x 2 (254 stitches)
Round
23: [(Sc in the next five stitches, sc2 in the next stitch, sc in the next six
stitches) x 8, sc in the next three stitches, sc3 in the next stitch, sc in the
next three stitches, (sc in the next five stitches, sc2 in the next stitch, sc
in the next six stitches) x 2] x 2 (278 stitches)
Round
24: [(Sc in the next three stitches, sc2 in the next stitch, sc in the next
nine stitches) x 6, sc in the next thirty stitches, sc3 in the next stitch, sc
in the next thirty stitches] x 2 (294 stitches)
Round
25: [(Sc in the next thirteen stitches, sc2 in the next stitch) x 6, sc in the
next thirty-one stitches, sc3 in the next stitch, sc in the next thirty-one
stitches] x 2 (310
stitches)
Round
26: [(Sc in the next fifteen stitches) x 6, sc in the next thirty-two stitches,
sc3 in the next stitch, sc in the next thirty-two stitches] x 2 (314 stitches)
Round
27: [(Sc in the next fifteen stitches) x 6, sc in the next sixteen stitches,
skip one stitch, sc in the next sixteen stitches, sc3 in the next stitch, sc in
the next sixteen stitches, skip one stitch, sc in the next sixteen stitches] x
2 (314
stitches)
Round
28: [(Sc in the next fifteen stitches) x 6, skip one stitch, sc in the next
thirty-two stitches, sc3 in the next stitch, sc in the next thirty-two stitches,
skip one stitch] x 2 (314 stitches)
(Somewhere in the next row the cord will
run out. Stop working the pattern when
you have about ½” of the cord left. Cut
the yarn about 1’ from the last stitch.
Pull the yarn through the last stitch and use the tail to tie the end of
the cord down.)
Round
29: [(Sc in the next fifteen stitches) x 6, sc in the next sixteen stitches,
skip one stitch, sc in the next sixteen stitches, sc3 in the next stitch, sc in
the next three stitches, sc in the next sixteen stitches, skip one stitch, sc
in the next sixteen stitches] x 2 (314 stitches)
Weave
in ends and sew down the starting cord end.
Dampen rug and block it out on a water resistant
surface.


No comments:
Post a Comment