
In honor of this I have another pattern out of the archives. This one is a couple years old and came about when I was experimenting with the different possibilities for a pint glass cozy that I had designed. (You never want your cold pint to get too slippery in the summer.) After playing around a bit, it turned out that the circular design worked well in a hot pad. The center of is is a bit high, but a lot of the old hot pad patterns had a high center as well. This hot pad is thick enough to put your steaming casserole on the table and decorative enough to just have hanging around the kitchen. I hope you enjoy it as much as I have.
Feel free to change the yarn, gauge, or size to fit your needs. Just please do not try to sell this pattern as your own.
If you have any problems that you think that I might be able to help you with, email me at GridMammalCrafts@gmail.com .


If you have any problems that you think that I might be able to help you with, email me at GridMammalCrafts@gmail.com .
Chain
Link Hot Pad

Materials:
Size G, 4.25
mm Crochet Hook
1 skein
Crème de la Crème, Worsted Weight Cotton, Tan – Color A
1 skein
Crème de la Crème, Worsted Weight Cotton, Royal Blue – Color B
Darning
Needle
Gauge:
18 sts x 20
rows = 4” x 4” in Single Stitches
Finished Size:
9” in
Diameter
Notes:
Be mindful
of the ring orientation when putting in the last ring to close the circle.
It is
easier to weave in yarn ends at the end of completing each ring
Abbreviations:
ch - chain
sc – single crochet
½ dc – half double stitch
dc –
double crochet
Instructions
Rings
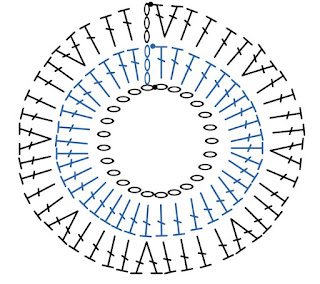
With Color A, chain 25, join with slip stitch to form a ring
RND 2: Ch 3 (counts as first dc), 39 dc into ring, join with
slip stitch at the top of the ch-3. – 40 dc
RND 3: Ch 3 (counts as first dc), dc in the next 3 dc, 2 dc
in the next dc, *dc in the next 4 dc, 2 dc in the next dc*. Repeat from * to * 6 more times and join with
a slip stitch at the top of the ch-3. –
48sts
Fasten off and weave in ends. This makes your first ring.

For sequential rings, after creating the chain 25, set the
previous ring in front of you with the right side facing up. Drop the tail of the chain through the center
of the previous ring and then join the chain into a ring with the slip
stitch. Work the rest of the ring by
rotating it through the previous ring.
Continue on in this manner until you have five rings linked
together, being sure to link each ring together in the same way as the one
previously.
The sixth ring is the last ring and the one that will join
the links together in a circle. Be
careful, this is the hardest step in the project. Put your chain of 25 through the previous
link as you have done before, but before you loin it together, weave it around the
first ring that you made and join. Your
linked chain will be in a kind of figure 8 and will feel wrong and tight. Complete RND 2 and after linking with your
slip stitch, lay out your work to make sure that all of your rings look like
they are traveling together in the same way.
If it does not, pull out your stitches and try looping your chain
through the rings again, paying close attention to how the other rings
interact. If you check after RND 2 and
all of your rings are behaving, complete the last ring.
Fasten off and weave in ends.

Lay out all of the rings so that they lay down flat with the
right sides facing up. Now you are going
to stitch around the outside of them to lock them into place. With a new strand of color A, sc once into
the top of 16 consecutive dc in the first ring.
Move to the next ring and sc once into the top of 16 of the next ring’s
dc. Continue this way until you are back
to where you started and the rings are secured.
Join with a slip stitch to your first sc. Fasten off and weave in ends.
Back
With Color B, chain 6 sc in a sliding loop, join with slip
stitch to the first stitch. (Mark first st to keep track of the beginning of
each row.)
RND 3: 2 sc in each sc (12 sts)
RND 4: * 1 sc in next sc, 2 sc in the next sc* repeat 5
times (18 sts)
RND 5: * 1 sc in the next 2 sc, 2 sc in the next sc * repeat
5 times (24 sts)

RND 6: * 1 sc in the next 3 sc, 2 sc in the next sc * repeat
5 times (30 sts)
RND 7: * 1 sc in the next 4 sc, 2 sc in the next sc * repeat
5 times (36 sts)
Continue on in this manner until you have 108 sc
Join with a slipstitch to the first stitch of the last
round.
Fasten off and weave in ends.
Putting Your Hot Pad
Together
Place your front ring chain onto your hot pad back with wrong
sides together. Feel free to tack both
sides together when you like the placement.
The side that has the rings on it will now be the right side.
RND: From the right side, start at a corner of the back
piece with Color B, move 1 stitch to the left and sc. Now *through the front
and the back, sc through the top of a ring edge stitch and the back edge
stitch, spike stitch through the row below the next stitch, spike stitch two
rows below the next stitch, spike stitch a row below the next stitch, sc in the
next two stitches, sc in the next two sc only through the back layer. Through the front and the back of the next
ring stitch through the top of a ring edge stitch and the back edge stitch,
spike stitch through the row below the next stitch, spike stitch two rows below
the next stitch, spike stitch a row below the next stitch, stitch in the next
two stitches, m sc in the next two sc only through the back layer. ½ dc, ch-1,
½ dc in the back corner sc, sc into the sc in the back.* Repeat from * to * 4
times, on the fifth time, do not do the final sc, but join with a slip st to
the first sc.

RND 2: Ch-1, *sc in
the next 17 stitches, (1/2 dc, dc, ½ dc) in the ch-1*, repeat from * to * 5
more times. Join with slip st to the
first ch-1.
Fasten off and weave in ends.
To keep the center of your rings from trying to lift up,
take a piece of color B yarn and sc into each circle from the center. Slip stitch into the first sc. Fasten off and weave in ends.

