Sunday, October 15, 2017

Halloween - Part 2: In Crochet

Nearly every night Bug-A-Boo asks to sing "The Itsy Bitsy Spider".  This, of course, includes all of the hand motions.  It's one of her favorite songs, mostly because of the had movements I think.  When we sing it in the car, she even runs through her version of the motions from her car seat.


It's a cute song.  It's nice and short, which unfortunately lends itself to repetition.  And at this point I'm pretty positive I could go through the whole thing, hands and all, in my sleep.

After the umpteenth time my mind has started to wonder while singing this song.  Sometimes it's different lyrics, which I am told are not OK to sing out loud.  Sometimes I just wonder if that itsy bitsy spider ever gets to be a big fat spider.

Out of this wondering came a Halloween doily and a short poem to go along with it.

If you would like a PDF of this pattern and have a Ravelry account, a copy can be found here.

If you would prefer a PDF from Etsy, it can be found here.

Feel free to change the thread, gauge, or size to fit your needs.  Add an edging, or leave it as is.  Just please do not try to sell this pattern as your own.

If you have any problems that you think that I might be able to help you with, email me at GridMammalCrafts@gmail.com .

Happy Halloween.

The Busy Spider

At once the little spider jumped out into the breeze, 
And landed on a fence post with the gentlest of ease.
She quickly got herself to work at spinning up her web,
And when her work all was done, she scampered off to bed.
Now I did not see her home as I climbed into the yard, 
But I certainly took notice when I found my way was barred.
I struggled and I swore, but it was all for naught.
For when it came down to it, I was absolutely caught.
Che came down to greet me and I plainly heard her say,
"Oh lucky me, I get to eat what cannot get away."

The Busy Spider Doily

Materials:
·         2 Spools Aunt Lydia’s Crochet Thread, Classic 10, %100 Mercerized Cotton, Color: Black, 350 yds
·         Size 8, 1.5 mm Crochet Hook
·         Small Darning Needle
Gauge:
·         46.2 stitches x 23.4 rows = 4” x  4”
·         15.4 squares x 23.4 rows = 4” x 4”
Finished Size:
·         20.5” Wide x 13.5” Tall
Notes:
·         Chart rows that are highlighted yellow are duplicate rows from a previous chart.
·         Remember, the last double crochet stitch in a block is the first double crochet stitch of the next block
·         All instructions are written in American crochet terminology.


Key:
            Filet Crochet
·         Filled Square = 1 Double Crochet Stitch through the top of the next 4 stitches from the previous row
-          First Filled Square in Row
-          Filled Square
·         Open Square = 1 Double Crochet Stitch, Chain 2, skip 2 stitches of the previous row, 1 Double Crochet Stitch in the next stitch of the previous row
-          Open Square
Chart Layout:
·         Unfortunately, for ease of reading, the pattern had to be broken up over several pages.  The edges of each row and column are numbered and the section of the pattern is labelled with a header.  The sections are oriented as shown in the following table.  I would suggest, depending on your tastes, working along an entire row as you go along.  This will take you across a couple pattern pieces as you finish each line.  On the final page you will find the pattern in its entirety, but very small to fit on a single page.
A
B
C
D

Just the Beginning:
Base: Chain 238 (loosely) + chain 3     
                        (This the will create a base chain of 238 and the chain 3 will be the first double stitch of the wall of the first square)
            Row 1: Turn work, double crochet into the fifth chain from the hook, double crochet into the next 236 ch
            Row 2: Chain 3, turn work, dc into the second dc from the hook, dc into the next 235 dc, dc in the end ch 3
            Rows 3, 4,  & 5: Chain 3, turn work, dc into the second dc from the hook, dc into the next 5dc, (ch 2, skip 2 dc, dc in the next dc) x 3, dc in the next 6 dc, (ch 2, skip 2 dc, dc in the next dc) x 65, dc in the next 6 dc, (ch 2, skip 2 dc, dc in the next dc) x 3, dc in the next 5 dc,  dc in the end ch 3


Charts:
A

B

C

D

Whole Chart


Sunday, October 1, 2017

Halloween - Part 1: In Knitting

When I was a kid, autumn was my favorite time of year.  It meant new adventures and lessons.  The light took on a transition quality as summer cooled into winter.  Fruits and vegetables were in great supply and the season of feasting was just beginning.

It also contained my favorite holiday, Halloween.  No longer a European tradition, America had made it its own generations before I was around.  It was the only holiday of the year that was celebrated with costumes, foods, and activities, but didn't have the stress of having to make sure the house was clean or a banquet was prepared.  Everyone could be anyone, or anything.  You didn't have to look nice, or fit into anyone else's expectations.  You could be daring, or spooky, or beautiful, or all of the above.  It was my holiday.

I liked it so much that I would start getting excited as soon as decoration began to be sold in stores.  In my hometown, Hallmark was usually the first store to carry Halloween decor in early August.  This was my signal to start gearing up.


Early on someone (I think it was Mom) taught me to make little ghosts out of two pieces of paper towels and some string.  This was before we could buy half sheet paper towels, so all of the sheets were square.  One just crumpled up one paper towel into a loose ball, placed it in the center of the second sheet, wrapped the second sheet around this core, and tied it underneath the ball with the string.  It was fast and simple.  When each one was done you could then draw on a face of your choice with markers.  I have no idea how many of these ghosts I made over the years, but I'm sure paper towel consumption went up in our household in the fall.

In the interest of being a bit more reusable and versatile I'm introducing a knitted version of my little ghosts.  They don't work quite as well for sopping up messes, but they are just as decorative.

If you would like a PDF of this pattern and have a Ravelry account, a copy can be found here.

If you would like a PDF of this pattern from Etsy, it can be found here.

Feel free to change the yarn, gauge, or size to fit your needs.  Just please do not try to sell this pattern as your own.

If you have any problems that you think that I might be able to help you with, email me at GridMammalCrafts@gmail.com .


Lacy Ghosty
Materials:
·         1 Skein Loops & Threads, Woolike, 678 yds./620 m, 85% Acrylic 15% Nylon, Color: Ivory
·         Size 2, 2.75 mm Double Point Needles
·         Size 1, 2.75 mm Crochet Hook (Optional)
·         1/8” Ribbon (Optional)
·         Stitch Marker
·         Darning Needle
·         Small amount of Polyester Fiberfil

Gauge:
·         9 Stitches x 11 Rows = 1” x 1” in Stockinette with Size 2 Needles

Finished Size:
·         Head: Approx. 2.75” Wide x 1.75” Deep x 2” Tall
·         Shroud: Approx. 5.75” Neck to Corner, 11.5” Corner to Corner

Notes:
·         The initial cast on is a Figure-Eight Cast On.
·         The Head Chart will be completed twice in the round.
·         The Shroud Chart will be done four times in the round.
·         When stitch counts for a round change, the final count will be noted at the end of the round in (blue italics)
·         Final bind off uses the Elastic Bind Off

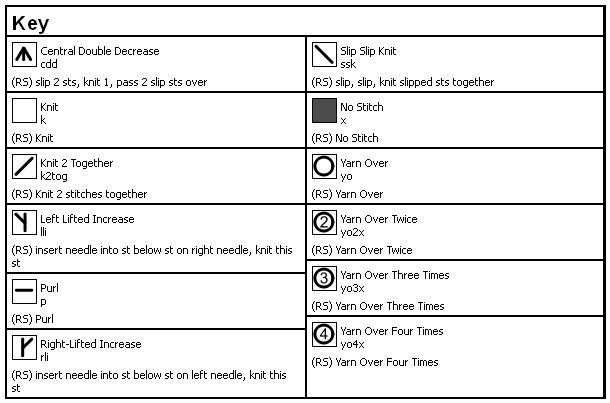
Key:

Instructions:
Head
Ghost Head Chart: Complete each row twice in the round.

Cast on 20 stitches using a Figure-Eight Cast On.
Round 1: (k10) x 2
Round 2: (rli, k1, lli, k8, rli, k1, lli) x 2 (28 stitches)
Round 3: (k14) x 2
Round 4: (k1, rli, k1, lli, k10, rli, k1, lli, k1) x 2 (36 stitches)
Round 5: (k18) x 2
Round 6: (k2, rli, k1, lli, k12, rli, k1, lli, k2) x 2 (44 stitches)
Round 7: (k22) x 2
Round 8: (k3, rli, k1, lli, k14, rli, k1, lli, k3) x 2 (52 stitches)
Round 9: (k26) x 2
Round 10: (k4, rli, k1, lli, k16, rli, k1, lli, k4) x 2 (60 stitches)
Round 11: (k30) x 2
Rounds 12 through 21: Repeat Round 11
This is a good point to sew in your original yarn tail.
Round 22: (k3, cdd, k18, cdd, k3) x 2 (52 stitches)
Round 23: (k26) x 2
Round 24: (k2, cdd, k16, cdd, k2) x 2 (44 stitches)
Round 25: (k22) x 2
Round 26: (k1, cdd, k14, cdd, k1) x 2 (36 stitches)
Round 27: (p18) x 2
Round 28: (cdd, k12, cdd) x 2 (28 stitches)
Round 29: (k14) x 2
Round 30: (ssk, k10, k2tog) x 2 (24 stitches)
Round 31: (ssk, k8, k2tog) x 2 (20 stitches)
Round 32: (ssk, k6, k2tog) x 2 (16 stitches)
Round 33: (ssk, k4, k2tog) x 2 (12 stitches)
Cut the yarn leaving at least a 6” tail.
Thread tail through remaining stitches, but do not pull tight yet.
Remove needles and stuff head.
Pull yarn tight and sew in yarn.

Shroud
Ghost Shroud Chart: Complete each row four times in the round.

Using the double point needles pick up thirty-six stitches from the outside in off of the purled stitches and join in the round.
Round 1: (k9) x 4
Round 2: (yo, k8, yo, k1) x 4 (44 stitches)
Round 3: (k11) x 4
Round 4: (yo, k5, yo, k5, yo, k1) x 4 (56 stitches)
Round 5: (k14) x 4
Round 6: (yo, k13, yo, k1) x 4 (64 stitches)
Round 7: (k16) x 4
Round 8: (yo, k5, yo, k5, yo, k5, yo, k1) x 4 (80 stitches)
Round 9: (k20) x 4
Round 10: (yo, k19, yo, k1) x 4 (88 stitches)
Round 11: (k22) x 4
Round 12: (yo, k11, yo2x, k10, yo, k1) x 4 (104 stitches)
Round 13: (k13, p1, k12) x 4
Round 14: (yo, k25, yo, k1) x 4 (112 stitches)
Round 15: (k28) x 4
Round 16: (yo, k9, yo2x, k9, yo2x, k9, yo, k1) x 4 (136 stitches)
Round 17: (k11, p1, k10, p1, k11) x 4
Round 18: (yo, k33, yo, k1) x 4 (144- stitches)
Round 19: (k36) x 4
Round 20: (yo, k9, yo, k9, yo2x, k9, yo, k8, yo, k1) x 4 (168 stitches)
Round 21: (k21, p1, k20) x 4
Round 22: (yo, k41, yo, k1) x 4 (176 stitches)
Round 23: (k44) x 4
Round 24: (yo, k8, yo, k9, yo, k9, yo, k9, yo, k8, yo, k1) x 4 (200 stitches)
Round 25: (k50) x 4
Round 26: (yo, k49, yo, k1) x 4 (208 stitches)
Round 27: (k52) x 4
Round 28: (yo, k13, yo, k12, yo3x, k13, yo2x, k13, yo, k1) x 4 (240 stitches)
Round 29: (k28, p1, k15, p1, k15) x 4
Round 30: (yo, k59, yo, k1) x 4 (248 stitches)
Round 31: (k62) x 4
Round 32: 9yo, k10, yo, k10, yo2x, k10, yo, k11, yo, k10, yo, k10, yo, k1) x 4 (280 stitches)
Round 33: (k23, p1, k46) x 4
Round 34: (yo, k69, yo, k1) x 4 (288 stitches)
Round 35: (k72) x 4
Round 36: (yo, k24, yo3x, k23, yo3x, k24, yo, k1) x 4 (320 stitches)
Round 37: (k26, p1, k25, p1, k27) x 4
Round 38: (yo, k79, yo, k1) x 4 (328 stitches)
Round 39: (k82) x 4
Round 40: (yo, k18, yo, k23, yo4x, k22, yo, k18, yo, k1) x 4 (360 stitches)
Round 41: (k44, p1, k1, p1, k43) x 4
Round 42: (yo, k89, yo, k1) x 4 (368 stitches)
Round 43: (k92) x 4
Round 44: (yo, k1, yo, k44, yo2x, k1, yo2x, k44, yo, k1, yo, k1) x 4 (400 stitches)
Round 45: [(p1, k1) x 50] x 4
Round 46: (yo, k1, yo, k1, yo, k45, yo, k2tog, yo, k2tog, yo, k2tog, k44, yo, k1, yo, k1, yo, k1) x 4 (424 stitches)
Round 47: (p106) x 4
Bind off all stitches knit-wise with an elastic bind off.
Cut yarn and weave in ends.
Block as desired.